黑群晖引导自动编译
黑群晖的引导盘制作原来一直是个挺复杂的事情,但是自从有了下面这些项目,引导的制作变得非常简单,感谢大神们!
- pocopico/tinycore-redpill
- fbelavenuto/arpl: Automated Redpill Loader
- wjz304/arpl-i18n: Automated Redpill Loader(i18n) arpl i18n (多语言优化版)
arpl自动制作引导盘
下面是基于arpl的操作步骤:
1、准备一个2G以上的U盘
2、下载镜像文件
原版:Releases · fbelavenuto/arpl
多语言版:Releases · wjz304/arpl-i18n
3、通过写盘工具(如balenaEtcher 等)写入到U盘中
4、将U盘插入到黑群晖机器上,开机设置从U盘启动
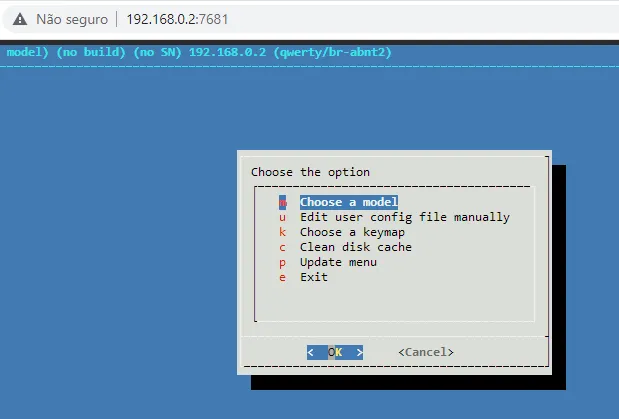
5、启动完成后会在进入如下页面:

6、可以通过下面两种方式登录到系统:
- 从另一台机器进入同一网络,在浏览器中输入屏幕上提供的地址
http://<ip>:7681 - 从另一台机器进入同一网络,使用ssh客户端,用户名:
root和密码:Redp1lL-1s-4weSomE
7、登录系统后输入munu.sh回车进入配置页面:
- 选择型号


- 选择系统版本

- 进入“Serial”菜单,选择“Generate a random Serial number”,也可以选择手动输入。
- 选择“Build”选项,等待加载器生成

- 选择“Boot”选项,等待DSM启动:

8、通过以上步骤就完成一个引导盘的制作了。
wjz304版本的一些命令
arpl各版本间切换(手动方式, 全量) (Any version):
1
2
3
4
5
6
7
8
9
10
11
# 在 shell 中下载需要的版本或者手动上传到/opt/arpl/下
# Download the required version in the shell or manually upload it to/opt/arpl/
curl -kL -o /opt/arpl/arpl.zip https://github.com/wjz304/arpl-i18n/releases/download/23.4.5/arpl-i18n-23.4.5.img.zip
# 卸载挂载的引导盘
# Uninstalling the mounted boot disk
umount /mnt/p1 /mnt/p2 /mnt/p3
# 解压 并写入到引导盘
# Decompress and write to the boot disk
unzip -p arpl.zip | dd of=`blkid | grep 'LABEL="ARPL3"' | cut -d3 -f1` bs=1M conv=fsync
# 重启 reboot
rebootarpl各版本间切换(菜单更新, 增量)(arpl / arpl-zh_CN / arpl-i18n(ver < 23.4.5)):
1
2
3
4
5
6
7
8
9
10
# shell 下输入以下命令修改更新 repo.
# 如果要切换原版修改第二条命令中的 wjz304/arpl-i18n 为 fbelavenuto/arpl
# 如果切换中文版修改第二条命令中的 wjz304/arpl-i18n 为 wjz304/arpl-zh_CN
# Enter the following command under the shell to modify and update repo
# If you want to switch the original version and modify wjz304/arpl-i18n to fbelavenuto/arpl in the second command.
# If you switch to the Chinese version and modify the wjz304/arpl-i18n to wjz304/arpl_zh_CN in the second command.
CURREPO=`grep "github.com.*update" menu.sh | sed -r 's/.*com\/(.*)\/releases.*/\1/'`
sed -i "s|${CURREPO}|wjz304/arpl-i18n|g" /opt/arpl/menu.sh
# 进入设置菜单执行更新arpl操作即可. 更新后请重启.
# Simply enter the main menu and perform the update arpl operation. Please restart after the update.arpl 备份 (Any version):
1
2
3
4
# 备份为 disk.img.gz, 自行导出.
dd if=`blkid | grep 'LABEL="ARPL3"' | cut -d3 -f1` | gzip > disk.img.gz
# 结合 transfer.sh 直接导出链接
curl -skL --insecure -w '\n' --upload-file disk.img.gz https://transfer.sharpl 持久化 /opt/arpl 目录的修改 (Any version):
1
2
3
4
5
6
7
RDXZ_PATH=/tmp/rdxz_tmp
mkdir -p "${RDXZ_PATH}"
(cd "${RDXZ_PATH}"; xz -dc < "/mnt/p3/initrd-arpl" | cpio -idm) >/dev/null 2>&1 || true
rm -rf "${RDXZ_PATH}/opt/arpl"
cp -rf "/opt/arpl" "${RDXZ_PATH}/opt"
(cd "${RDXZ_PATH}"; find . 2>/dev/null | cpio -o -H newc -R root:root | xz --check=crc32 > "/mnt/p3/initrd-arpl") || true
rm -rf "${RDXZ_PATH}"arpl 修改所有的pat下载源 (Any version):
1
2
sed -i 's/global.synologydownload.com/cndl.synology.cn/g' /opt/arpl/menu.sh `find /opt/arpl/model-configs/ -type f'`
sed -i 's/global.download.synology.com/cndl.synology.cn/g' /opt/arpl/menu.sh `find /opt/arpl/model-configs/ -type f'`arpl 更新慢的解决办法 (arpl-zh_CN / arpl):
1
2
3
sed -i 's|https://.*/https://|https://|g' /opt/arpl/menu.sh
sed -i 's|https://github.com|https://ghproxy.homeboyc.cn/&|g' /opt/arpl/menu.sh
sed -i 's|https://api.github.com|http://ghproxy.homeboyc.cn/&|g' /opt/arpl/menu.sharpl 去掉pat的hash校验 (Any version):
1
sed -i 's/HASH}" ]/& \&\& false/g' /opt/arpl/menu.sharpl 下获取网卡驱动 (Any version):
1
for i in `ls /sys/class/net | grep -v 'lo'`; do echo $i -- `ethtool -i $i | grep driver`; donearpl 使用自定义的dts文件 (arpl(ver > v1.1-beta2a / arpl-zh_CN):
1
2
# 将dts文件放到/mnt/p1下,并重命名为model.dts. "/mnt/p1/model.dts"
sed -i '/^.*\/addons\/disks.sh.*$/a [ -f "\/mnt\/p1\/model.dts" ] \&\& cp "\/mnt\/p1\/model.dts" "${RAMDISK_PATH}\/addons\/model.dts"' /opt/arpl/ramdisk-patch.sharpl 离线安装 (arpl_zh_CN(ver > ++-v1.3) / arpl-i18n):
1
2
3
4
5
6
7
8
1. arpl 下
# arpl下获取型号版本的pat下载地址 (替换以下命令中的 版本号和型号部分)
yq eval '.builds.42218.pat.url' "/opt/arpl/model-configs/DS3622xs+.yml"
# 将pat重命名为<型号>-<版本>.pat, 放入 /mnt/p3/dl/ 下
# 例: /mnt/p3/dl/DS3622xs+-42218.pat
2. pc 下
# 通过 DG等其他软件打开arpl.img, 将pat重命名为<型号>-<版本>.pat, 放入 第3个分区的 /dl/ 下.arpl 增删驱动 (Any version):
1
2
3
4
5
6
7
8
9
10
11
# 1.首先你要有对应平台的驱动 比如 SA6400 7.1.1 增加 r8125
# 略
# 2.解包
mkdir -p /mnt/p3/modules/epyc7002-5.10.55
gzip -dc /mnt/p3/modules/epyc7002-5.10.55.tgz | tar xf - -C /mnt/p3/modules/epyc7002-5.10.55
# 3.放入或删除驱动
# 略
# 4.打包
tar -cf /mnt/p3/modules/epyc7002-5.10.55.tar -C /mnt/p3/modules/epyc7002-5.10.55 .
gzip -c /mnt/p3/modules/epyc7002-5.10.55.tar > /mnt/p3/modules/epyc7002-5.10.55.tgz
rm -rf /mnt/p3/modules/epyc7002-5.10.55.tar /mnt/p3/modules/epyc7002-5.10.55
一些有用的群晖命令
ssh 开启 root 权限:
1
2
3
4
sudo -i
sed -i 's/^.*PermitRootLogin.*$/PermitRootLogin yes/' /etc/ssh/sshd_config
synouser --setpw root xxxxxx # xxxxxx 为你要设置的密码
systemctl restart sshddsm下挂载引导盘:
1
2
3
4
5
6
7
8
9
10
11
sudo -i
echo 1 > /proc/sys/kernel/syno_install_flag
ls /dev/synoboot* # 正常会有 /dev/synoboot /dev/synoboot1 /dev/synoboot2 /dev/synoboot3
# 挂载第1个分区
mkdir -p /tmp/synoboot1
mount /dev/synoboot1 /tmp/synoboot1
ls /tmp/synoboot1/
# 挂载第2个分区
mkdir -p /tmp/synoboot2
mount /dev/synoboot2 /tmp/synoboot2
ls /tmp/synoboot2/dsm下重启到arpl(免键盘) (Any version):
1
2
sudo -i # 输入密码
/usr/bin/arpl-reboot.sh "config"dsm下修改sn (Any version):
1
2
3
4
5
6
7
sudo -i # 输入密码
SN=xxxxxxxxxx # 输入你要设置的SN
echo 1 > /proc/sys/kernel/syno_install_flag
[ -b "/dev/synoboot1" ] && (mkdir -p /tmp/synoboot1; mount /dev/synoboot1 /tmp/synoboot1)
[ -f "/tmp/synoboot1/user-config.yml" ] && OLD_SN=`grep '^sn:' /tmp/synoboot1/user-config.yml | sed -r 's/sn:(.*)/\1/; s/[\" ]//g'`
[ -n "${OLD_SN}" ] && sed -i "s/${OLD_SN}/${SN}/g" /tmp/synoboot1/user-config.yml
reboot群晖 opkg 包管理:
1
2
3
wget -O - http://bin.entware.net/x64-k3.2/installer/generic.sh | /bin/sh
/opt/bin/opkg update
/opt/bin/opkg install rename